As the name suggests, project settings are specific to the project you are working in and they can be accessed by clicking project settings, from the tools slide out menu, under miscellaneous.

Details Tab

The first tab that appears is the details tab. From here, you can easily modify a project’s name and description without having to leave the designer.
Designer Tab
The designer tab has a few options which control behaviour within the designer whilst editing your project.
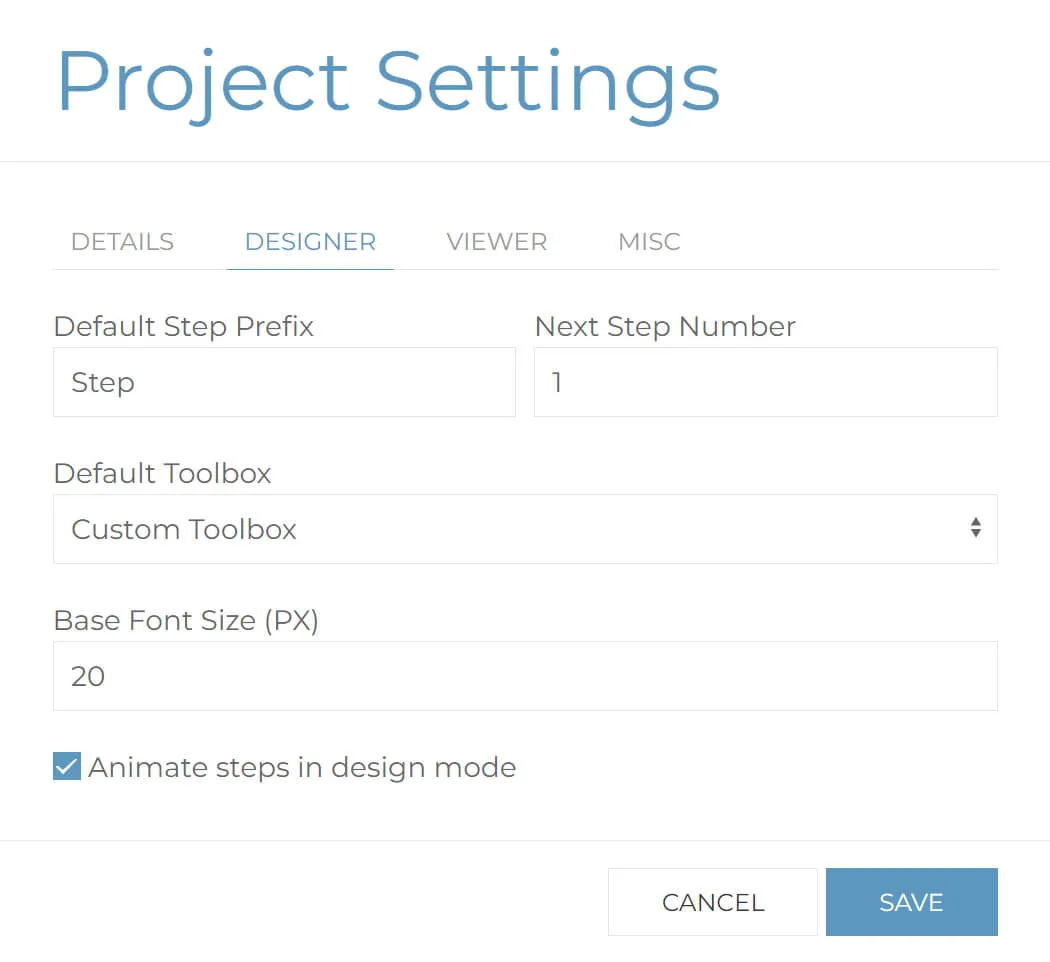
Step Prefix and Number
Whenever a new step is created, it automatically gets assigned a default prefix and a step number. The format for both of these can be modified from the designer tab. So, for example you could simply change the name of your steps to ‘view’ or ‘image’ or even a more bespoke naming convention that is used within your business. Setting the next step number can be handy if you have deleted a number of steps and want a continuous sequence for your new steps.
Default Toolbox
The default toolbox can be set, so that whenever you browse into the toolbox slide out menu, you can see exactly what you need. Remember that you can build your own custom toolboxes too, meaning you only have to see the 2D markup that is relevant to you.
Base Font Size
The base font size sets the initial size for all text markup. When you are then formatting text, the size you set is simply a multiple of this base size. For more information about how this works, check out the Fonts blog article and video.
Animating steps in design mode
Animating between steps when viewing a project is one of the features that helps users fully understand the assembly procedure and really helps bring your presentation to life. These animations can take a few seconds to complete though, which is perfect in the viewer, but can slow you down in the designer. To speed up design time in the designer, these animations can be disabled or enabled by toggling the ‘Animate steps in design mode’ option. This is great when you are wanting to go through all your steps and review them.
Viewer Tab
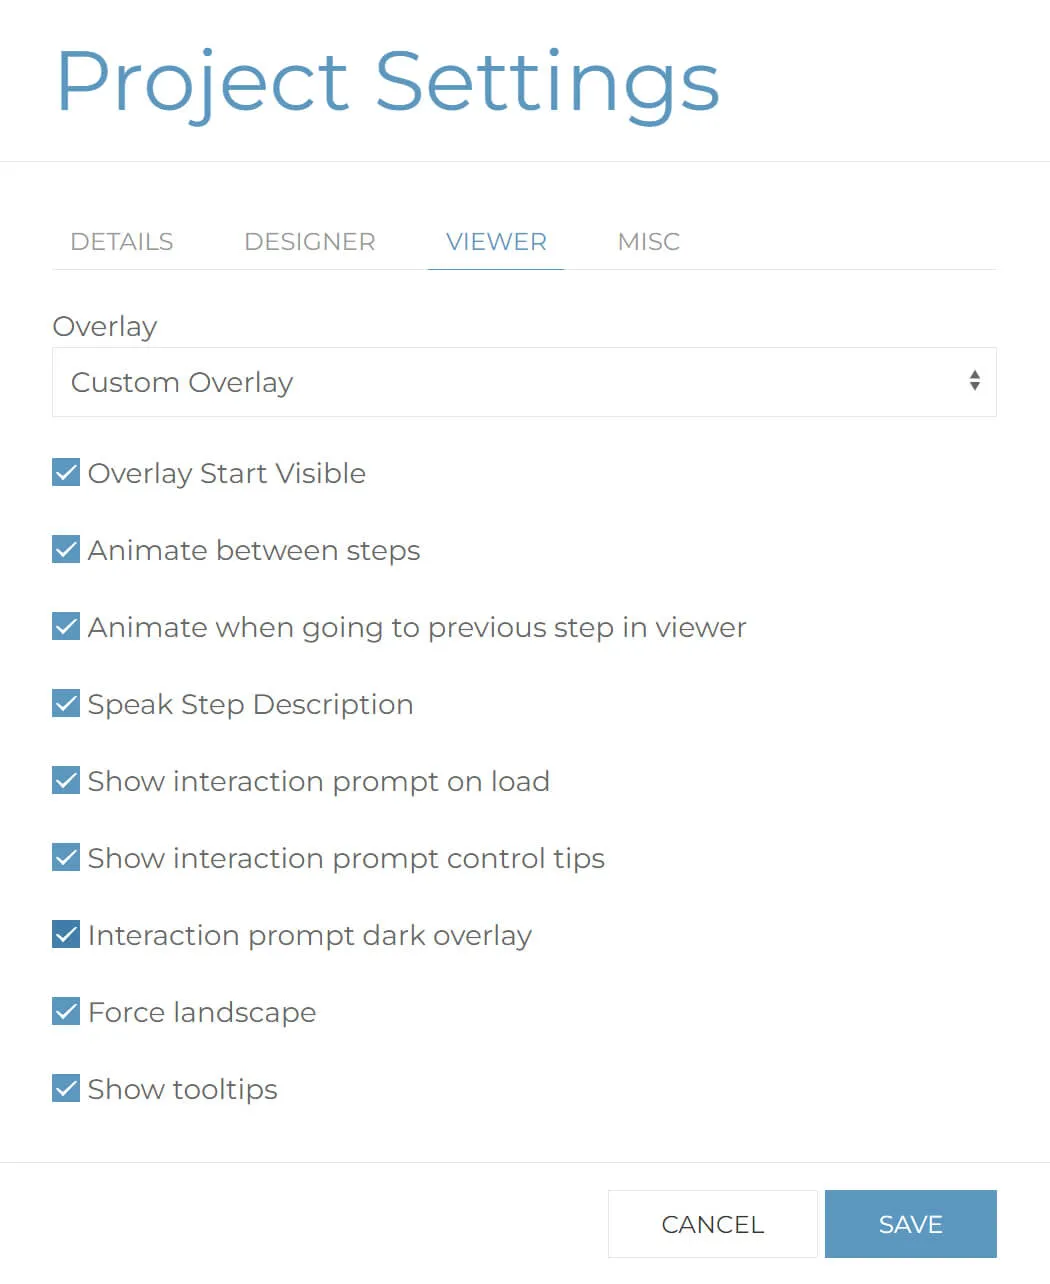
There are a number of settings that can be modified for when a project is published and opened in the viewer. These are found on the viewer tab.
Overlay
The first is the overlay option. An overlay is a defined set of controls and information that sits on top of your project. It can have controls to navigate through your steps, such as a next and previous button, and may have additional information such as the step description and even a progress bar, indicating how far someone is to completion of the project. Use this drop down to assign an available overlay to this project. For more information about overlays see our separate overlays blog and video.
Overlay start visible
There may be times when you don’t want the overlay to be visible when the viewer first opens up your project, instead letting the user choose if they want to see it. Again, this is covered in more detail within the overlays quick tip video.
Animate between steps
Similar to in the designer, where we can control whether steps are animated or not, animate between steps can also be globally controlled for the viewer. Generally, you will want this option switched on, but if you want to disable all of a project's animations without having to remove them from each step, simply untick this box.
Animate when going to previous step in viewer
When creating a project, more often than not you will be setting animations based on the direction the user will navigate through the project, usually assembling a product. However, it’s not uncommon for users to need to navigate backwards to a previous step. In order to speed up this process, the playback of animations when going to previous steps can be disabled.
Speak step description
Speak step description is an audio queue that will be played when navigating between steps. How the voice sounds will depend upon the browser being used.
Show interaction prompt on load
The interaction prompt is an animated graphic that explains to a user that the project is interactive. Enabling this option will display a graphic when the project is first loaded in the viewer.
Show interaction prompt control tips
In addition to the animated graphic, control tips can also be shown. These explain how to navigate a project using a mouse when on a desktop device or by touch gestures when using a mobile or tablet device.
Interaction prompt dark overlay
To make the interaction prompts more visible, you can also set a dark overlay. This displays a semi-transparent dark overlay across the project whilst the interaction prompts are visible.
Force Landscape
When viewing a project on a mobile device, it’s often best that content to be viewed in landscape. Enabling the force landscape option will try to make the user view the project in landscape. Depending on the device’s operating system, it will either force the screen to be horizontal, or if it can’t do that, show a message asking the viewer to rotate the device before they can continue.
Show Tooltips

Every CAD object in a project has a tooltip which can show additional information about the object when it is clicked on in the viewer. This can mitigate the need to manually position 2D markup in the designer. Enable the ‘show tooltips’ option, and when viewing a project in the viewer, clicking on any cad object will show its tooltip. Check out our blog on tooltips for more information.
Misc Tab

Hide edges when animating and camera move
The hide edges when animating and camera move option, will disable edges when any camera movement or animation takes place. This option applies to both the designer and the viewer. Hiding edges offers performance benefits and improves frame rate. If you are working with assemblies that have a large amount of complex edges, ticking this option on will improve frame rate, especially on mobile devices.
Cache images
When the cache images option is enabled, any images within your project will automatically be cached by your browser, improving performance and load times. This option is enabled by default, and we recommend keeping it switched on.