.webp)
With IP Whitelisting, you can now specify a list of approved IP addresses (individual or a range) that are allowed to view your published Cadasio projects. Any requests from IP addresses outside of this list will be automatically blocked, keeping your sensitive data and intellectual property private.
Why IP Whitelisting Matters
Whether you’re working on confidential product documentation, internal training materials, or client-only content, IP Whitelisting offers an extra layer of protection beyond project passwords or links. Here’s why this is particularly valuable:
- 🔒 Enhanced privacy: Only users connecting from your whitelisted IPs can access your projects.
- 🛡️ Stronger security controls: Reduce the risk of unauthorised access, even if someone obtains a project link.
- ✅ Compliance support: Helps meet security and data governance policies within your organisation.
For teams conscious about protecting sensitive information or operating under strict security guidelines, this is a simple but powerful tool to help lock down your documentation.
How IP Whitelisting Works in Cadasio
IP Whitelisting is easy to set up, the above video guides you through it, or follow the below procedure.
Step 1 - Enable IP Whitelisting from your Dashboard:

- Log into your Cadasio account.
- Go to Settings → Customisation, and toggle on the IP Whitelisting option.
- Click the add button.
- Give your whitelist a descriptive name.
- Add the IP addresses or ranges you want to allow.
.webp)
You can add an IP in the following formats:
Match an IP address exactly – 192.168.1.15
Matches a range - 192.168.3.0-255
Matches all IPs in a subnet (CIDR notation) - 192.168.1.0/24
Step 2 - Apply the whitelist to your project:
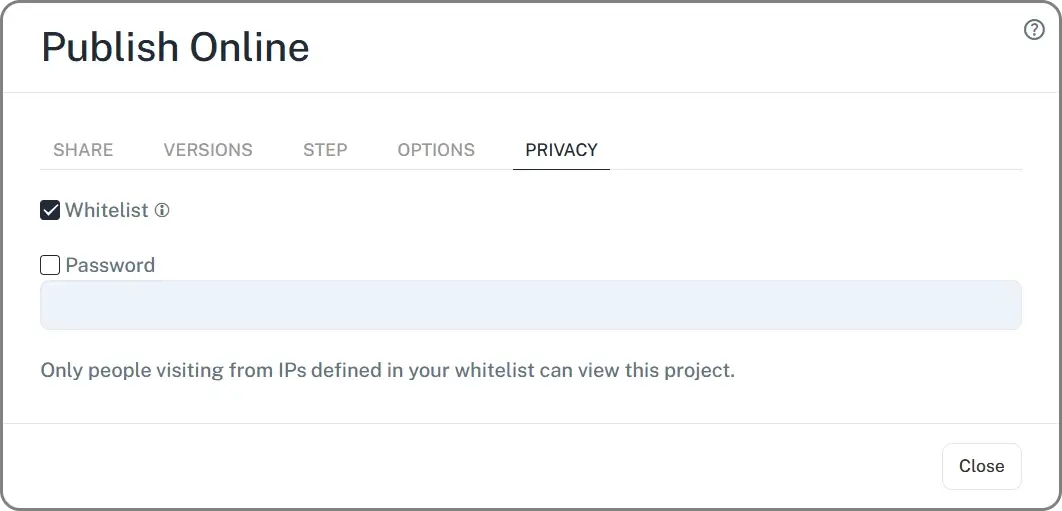
- Navigate to your project’s Privacy Settings.
- Tick the Enable IP Whitelisting checkbox.
Once applied, anyone trying to access your published project without a matching IP address will be denied access and shown a message informing them of the restriction, keeping your project strictly available to those you trust.
How to Find Your IP Address
Not sure what IP address to whitelist? Here’s a quick step-by-step for identifying your IP address:
If you’re working remotely or from home:
- Open your preferred web browser.
- Head to a site like https://whatismyipaddress.com (please note Cadasio is not affiliated to this site at all) or simply Google “What is my IP”.
- Your public IP address will be displayed at the top of the results.
- Copy that address and paste it into Cadasio’s IP Whitelisting field.
If you’re within a company network:
- Contact your IT department – they may provide you with a static IP or a range to use.
- If unsure, you can also use the same method as above to identify your current IP.
- If your company uses dynamic IPs or VPNs, we recommend checking if they have a set range or subnet to whitelist.
Tip: Remember that home and remote connections may change IP addresses periodically (unless you have a static IP). For dynamic IPs, you might consider whitelisting a broader subnet range if necessary.
Take Control of Your Project Security
IP Whitelisting is part of our ongoing mission to provide you with more tools to manage and safeguard your projects. Combined with project passwords you now have even greater flexibility when publishing your interactive content.
We recommend enabling this feature for:
- Sensitive or confidential projects
- Internal-only documentation
- Client-exclusive materials
- Compliance-sensitive environments (ISO27001, SOC2, etc.)
Available Now
IP Whitelisting is available immediately to all Cadasio Premium users. For further guidance reach out to our team — we’re always happy to help.